Classic Black Forest Cake Recipe
It’s time to indulge in the rich flavors of a Classic Black Forest Cake, a beloved German dessert that perfectly blends chocolate, cherries, and whipped cream. You’ll find that this decadent cake is not only visually stunning but also surprisingly simple to create in your own kitchen. In this post, you’ll discover step-by-step instructions, imperative ingredients, and tips to ensure your Black Forest Cake impresses everyone at your next gathering. So, roll up your sleeves and get ready to elevate your baking skills with this timeless recipe.
Ingredients
Before you begin on making a classic Black Forest cake, gather all the necessary ingredients to ensure your cake turns out perfectly. You will need chocolate cake layers, tart cherries, whipped cream, and chocolate shavings. These components come together to create the signature flavors you associate with this timeless dessert.
Key Components
Before stepping into the baking process, it’s important to understand the key components of your Black Forest cake. The chocolate cake layers provide the rich foundation, while the cherries add a delightful tartness. Freshly whipped cream brings a lightness, balancing the richness of the cake and cherries beautifully.
Optional Ingredients
Around your core ingredients, consider adding optional elements to enhance the flavor and texture of your cake. These can include Kirsch (a cherry brandy), extra cherry preserves, or even a splash of vanilla extract in your whipped cream for added depth. Each of these can elevate your dessert.
This flexibility allows you to customize your Black Forest cake to suit your personal taste. For instance, if you enjoy a hint of boozy flavor, incorporating Kirsch will give your cake an authentic German touch. Alternatively, you can amp up the sweetness with additional cherry preserves for a more intense fruit flavor. The choice is yours, so have fun with it and make the cake your own!
Baking the Cake
It’s time to bring your Black Forest cake to life by baking the layers. Begin by preheating your oven to 350°F (175°C), ensuring it’s at the perfect temperature for even baking. Line your cake pans with parchment paper and lightly grease them to prevent sticking. Pour the batter uniformly into the prepared pans and bake for 30-35 minutes, or until a toothpick inserted in the center comes out clean. Allow the cakes to cool in the pans for a few minutes before transferring them to a wire rack.
Preparing the Baking Pans
On your countertop, gather your 9-inch round cake pans, parchment paper, and non-stick cooking spray. Begin by cutting two circles of parchment paper to fit the base of each pan. After placing the parchment, spray the sides to ensure an easy release once your cake layers are baked.
Mixing the Batter
Beside preparing your pans, mixing the batter sets the foundation for your cake’s moistness and flavor. Combine your dry ingredients, including flour, cocoa powder, baking powder, and sugar, in a large bowl. Then, add your wet ingredients — eggs, milk, and vanilla extract — and mix until just combined.
Hence, incorporating your ingredients properly is imperative for achieving that perfect cake texture. Start by mixing the dry ingredients thoroughly to ensure even distribution, then gradually introduce the wet ingredients. Use a spatula or an electric mixer on low speed to blend until no lumps remain. Be cautious not to over-mix, as this can lead to a dense sponge. Your batter should be smooth and silky, ready to pour into the prepared pans.
Assembling the Cake
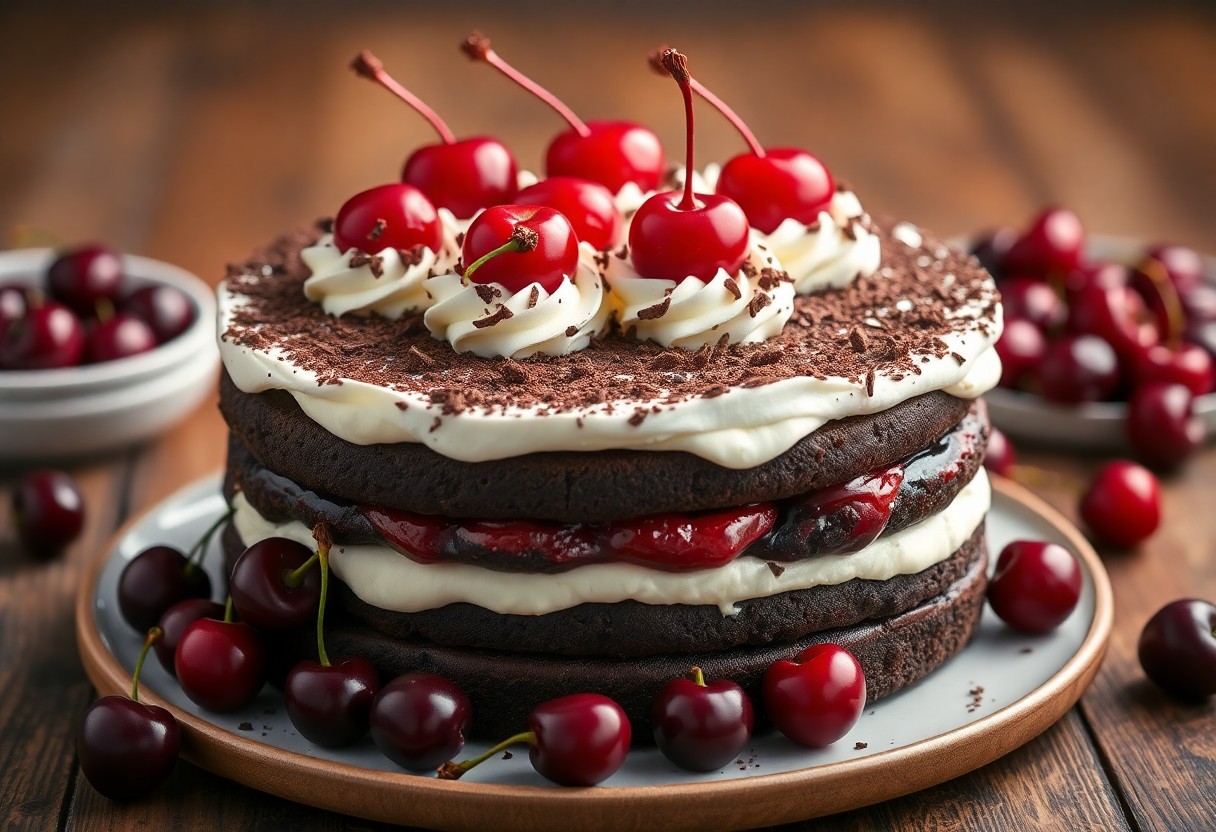
While assembling your Black Forest cake, begin by placing the first layer of cake on a serving platter. Ensure the layers are even, and keep your cherry filling and whipped cream ready for the next steps. The key to a beautiful presentation is to take your time during this process, allowing each layer to be perfectly balanced, making sure the luscious flavors meld together beautifully.
Slicing the Layers
An vital step in creating a beautiful Black Forest cake is slicing your layers evenly. Use a serrated knife to gently cut each cake layer in half horizontally. Aim for uniform thickness, which will ensure that every slice of your cake has the same delightful combination of flavors, making it visually appealing and delicious.
Layering with Cream and Cherries
Cherries are the star of the show in a Black Forest cake, as they provide a fruity contrast to the rich chocolate layers. Begin by spreading a layer of whipped cream on your first cake slice, then generously add some cherry filling, making sure to distribute the cherries evenly to maintain balance in flavor and texture.
Consequently, as you continue layering your cake, alternate between whipped cream and cherry filling for each layer. This will create a delightful contrast that enhances each bite. Be sure to preserve some whipped cream and cherries for the final decoration on top, turning your cake into a stunning centerpiece that showcases both its elegant look and the delicious flavors that await your guests.
Decorating the Cake
Your Black Forest cake is not complete until you give it a beautiful finish. Begin by applying a generous layer of whipped cream on top, swirling it to create an inviting design. Then, consider adding chocolate shavings or decorations, along with cherries, to enhance its classic look. The final touch will make your cake not only delicious but visually stunning, ready to impress your guests.
Whipped Cream Technique
Against the backdrop of the fluffy layers, perfecting your whipped cream application is necessary. Start with chilled heavy cream and whip it until soft peaks form. Use a spatula or piping bag to create smooth, elegant swirls on your cake, ensuring even coverage while maintaining that airy texture that complements the chocolate and cherries beautifully.
Garnishing with Chocolate
Along with whipped cream, chocolate shavings create a rich contrast on your Black Forest cake. They not only enhance the flavor but also add a touch of sophistication to your dessert.
Chocolate adds a delightful richness to the overall taste and elevates the presentation. To create chocolate shavings, use a vegetable peeler on a chilled chocolate bar or simply grate chocolate with a grater. Scatter the shavings atop your cake after frosting for an elegant finish, or arrange them around the base for a more dramatic effect. This garnishing technique not only satisfies chocolate lovers but also enhances the classic appeal of your cake.
Serving Suggestions
Keep your guests enchanted by serving slices of your Black Forest Cake alongside fresh cherries or a dollop of whipped cream. Consider garnishing with chocolate shavings or sprigs of mint for an extra touch of elegance. You can also serve the cake chilled for a refreshing treat on warm days, enhancing its delightful flavor profile.
Pairing with Beverages
Suggestions for beverage pairings include a rich cup of coffee, a fruity cherry-infused liqueur, or a sweet red wine. These choices will complement the chocolate layers and enhance the cherry flavors of your cake, making for a harmonious dessert experience.
Presentation Tips
To impress your guests, consider the following presentation tips for your Black Forest Cake:
- Use a beautiful cake stand to elevate the cake’s appearance.
- Slice the cake with a heated knife for clean, neat edges.
- Dust the top lightly with powdered sugar just before serving.
Knowing these tips can significantly enhance your cake’s visual appeal.
Attractively presenting your Black Forest Cake involves attention to detail. Here are some additional tips to make it visually stunning:
- Arrange fresh cherries attractively on top or around the base.
- Consider adding a drizzle of chocolate or cherry syrup for a dramatic effect.
- Use contrasting plates to make the cake pop.
Knowing these elements will help create a memorable presentation for your delicious creation.
Storage and Preservation
Not properly storing your Black Forest Cake can lead to a quicker loss of flavor and texture. To ensure your cake remains enjoyable for as long as possible, you should consider both short-term and long-term preservation methods that will keep it fresh and delicious.
Short-term Storage
Below, you will find effective ways to store your Black Forest Cake for up to a week. Keep the cake in an airtight container at room temperature if you plan on consuming it within a few days. If you’re aiming for freshness, placing it in the refrigerator will help maintain its moisture and taste.
Long-term Freezing
Preservation through freezing can extend the life of your Black Forest Cake significantly. Wrap individual slices in plastic wrap, then store them in an airtight freezer bag or container. This method prevents freezer burn and keeps your cake’s delicious flavor intact.
Indeed, freezing allows you to enjoy your Black Forest Cake for up to three months without sacrificing quality. When you’re ready to indulge, simply thaw it in the refrigerator overnight and let it come to room temperature before serving. This way, the cake will regain its moisture and deliver that classic rich taste you love.
Final Words
Summing up, mastering the Classic Black Forest Cake recipe will elevate your baking skills and impress your guests. By following the steps of creating rich chocolate layers, luscious cherry filling, and velvety whipped cream, you can indulge in a dessert that embodies elegance and flavor. This treat is perfect for celebrations or a delightful end to any meal. Enjoy the process, and savor the satisfying results as you share this classic dessert with family and friends.
